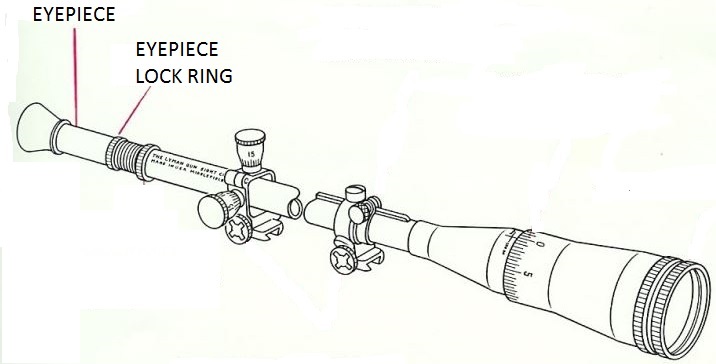
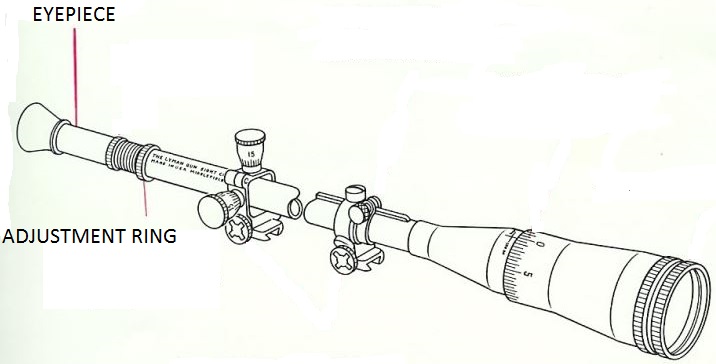
To focus the reticule, loosen the knurled lock ring located just
forward of the eyepiece (Eyepiece Lock Ring) and turn it several
full turns away from the eyepiece. Now, starting from its original
setting, back off the eyepiece several turns away from the lock
ring. Rest the telescope and point it at the sky. DO NOT LOOK AT AN OBJECT OR TARGET Start
slowly to turn the eyepiece toward the lock ring until the reticule
becomes clear and distinct. When the reticule appears sharp and
clear, rest your eye for several minutes and check it again. This
rechecking of the reticule will assure that your eye is not
accommodating itself to an incorrect setting. When the adjustment is
correct, tighten the lock ring against the eye-piece. Unless your
eyesight itself changes, the adjustment should always remain locked
in this position.
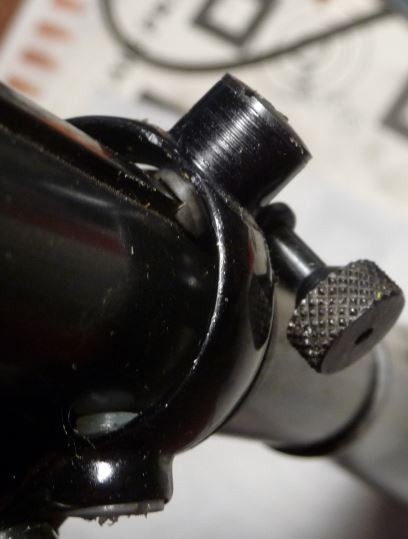
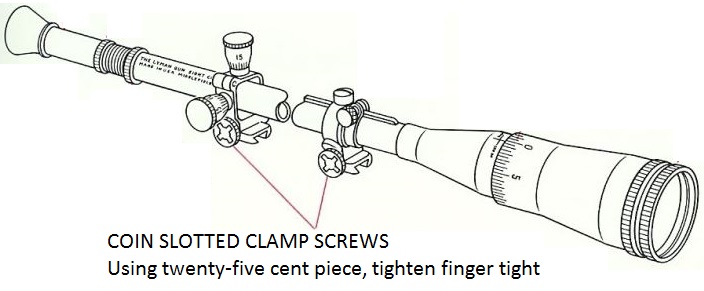
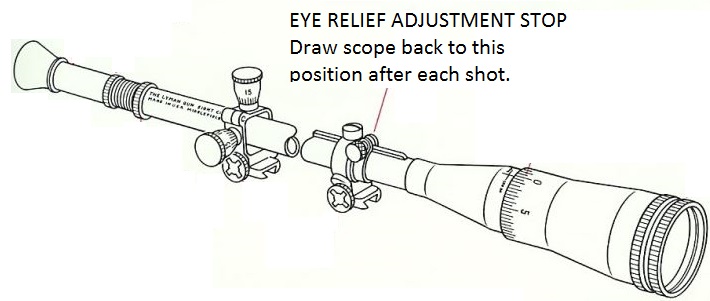
SETTING THE EYE RELIEF ADJUSTMENT STOP
After focusing the reticule, you can set the scope up for eye
relief. Simply loosen the knurled screw on the right of the scope
and slide the STS to the correct position. Then tighten the screw. NOTE: The scope will move FORWARD upon
firing. After firing, if you don't have the return coil spring
installed, simply pull back on the tube until it seats against the
stop.
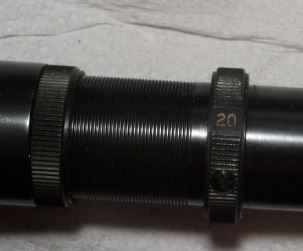
VERTICAL AND HORIZONTAL RETICULE ALIGNMENT
Just forward of the threaded eyepiece section is a second knurled
ring containing two screws (it has the scope power stamped on it).
Turning this ring will pivot the entire reticule assembly. The
reticule was adjusted into perfect vertical, and horizontal,
alignment before leaving the factory. The reticule can be adjusted
to compensate for any “canting” of the mounting blocks. To set the
reticule so that the cross wires will be perpendicular and
horizontal, merely loosen the two small set screws located on
opposite sides of the reticule adjusting ring which is the first
knurled ring back of the rear mount. DO NOT
REMOVE THESE SCREWS OR BACK THEM OUT TOO FAR. This allows
the ring to be freely rotated and reticule correctly placed. After
adjustment, re-tighten set screws and recheck setting.
Reticules:
Standard reticule is a .0007" cross-wire. Both .0005" or .001"
cross-wires were available. A dot, called a “Lee Dot” or a “Tack
Hole Dot” was available in 1/8”, ¼”, 3/8”, ½”, 5/8”, ¾”, 7/8”, or 1”
sizes (1 minute equals 1” at 100 yards)
Reticle Repair - One Way offshore44 wrote in this POST
The Lyman Super Targetspot scopes are actually pretty primitive
compared to modern stuff. The eye piece unscrews easily as part of
the adjustment for focus of the reticule. The tube that holds the
reticule screws into the scope body and is locked in place by a thin
thumb lock ring. So, the reticule holder can be removed easily with
no damage to the scope itself.
There is no nitrogen or seals to mess with. You don't come within an
inch of any lenses, nor disturb any lenses removing the reticule
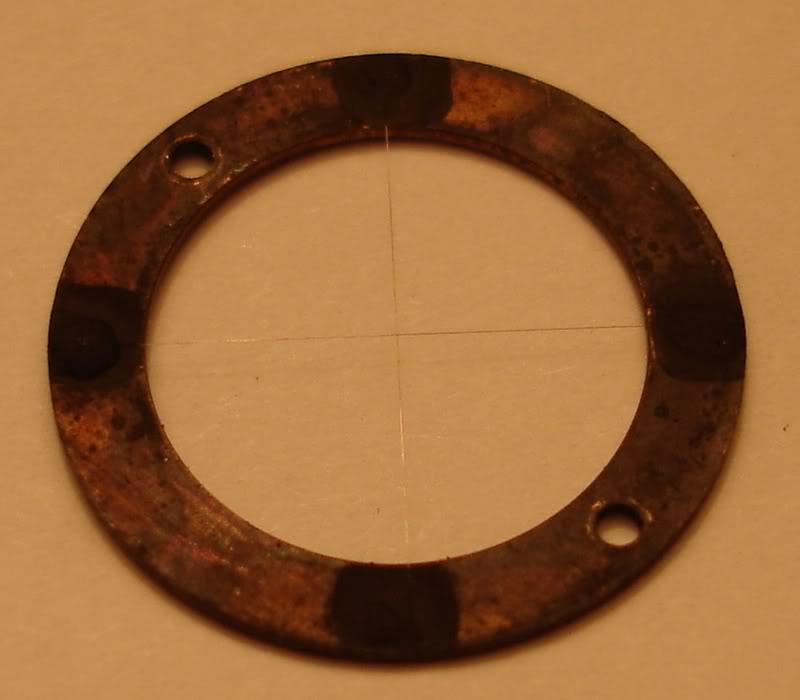
tube. I examined the reticule very closely under some bright lights
and discovered that the reticule assembly is a brass washer looking
thing with the cross hairs attached. The assembly is fastened with
two screws at about 2 and 8 o'clock. I gently removed the screws and
viola! the assembly came right off.
It is brass and looks like a washer. Being broke and all, I looked
around for brass - and low and behold - I have a whole box of misc.
range pickup brass under the bench. A little time and effort with
different files, drills, a hacksaw, whet stone and various and
sundry other hand tools and such allowed me to create a pretty close
duplicate of the mount plate. (Tools I've got.) Some two pound
fishing line and more effort and I was good to go. The original
reticule is totally unmolested, and will get shipped off to Parson's
as soon as I have the money.
I can shoot the rifle for anyway. Two pound fishing line is about
three times the diameter of the originals. I may make another one
just for giggles to play around with cross hair size and such...
Source for Replacement Cross-Wires
Go to fleabay and search for "Fine Tungsten Wire". Folks have used
fine human hair, single strands untwisted from dental floss, spider
web, and other things.
Changing Reticules
Reticules may be changed by unscrewing and removing the rear lens
extension but care must be exercised as the end of the reticule
holder extends beyond the tube into the rear lens extension. Using a
fine watch screw driver, the two screws holding the reticule can be
removed and the new reticule installed. Please note that there
appears to be TWO locating pins on the underside of the tube,
between the adjusting ring and the rear mount.
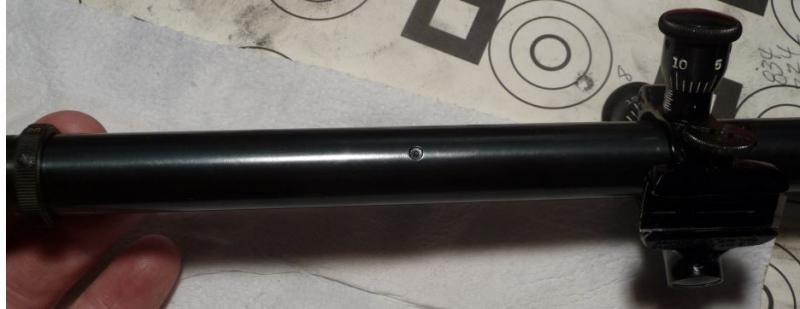
FOCUSING YOUR SCOPE FOR RANGE
The Super Targetspot is quickly and
accurately focused from 50 feet to infinity by turning the graduated
range adjusting sleeve located at the front of the scope to the
desired range position marked on the tube. The tube is marked with
setting points for various ranges from 50 feet to 200 yards or over.
Never adjust the sleeve below the "50 foot mark" or above "the 200
yard or over" mark. A NEW SCOPE WAS FACTORY SET AT THE 100 YARD
POSITION
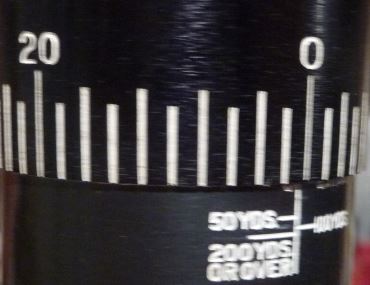
Adjust Scope to Another Range
To adjust for another range, loosen the adjusting sleeve cap located
at the front of the scope. There may be two knurled rings, one being
a grip on the objective bell, and the one in front being the actual
objective lock ring. Turn the range adjusting sleeve until the zero
mark on the sleeve aligns with the zero mark on the tube. From this
point, you make your new adjustment.
EXAMPLE. screwing the sleeve OUT 5
complete turns from zero is the 50 foot setting. Screwing the sleeve
IN 6 complete turns from ZERO is the 50 yard setting. Once your
correct setting is made, LOCK THE ADJUSTING SLEEVE CAP. The
objective lens is not positioned until this cop is securely locked.
TABLE OF RANGE SETTINGS*
50 feet -5 full turns
25 yards 0
50 yards +6 full turns
100 yards +8 full turns
200 yards or over +9 full turns
Range to turns... Hmm,
magnification is powers of two
0.50 12.5 yds
-6 (2 ^ -1)
0.75 18.5 yds
-5 (2 ^ ?)
1.00 25.0 yds
0 (2 ^ 0)
2.00 50.0 yds
+6 (2 ^ 1)
4.00 100 yds
+8 (2 ^ 2)
8.00 200 yds
+9 (2 ^ 4)
The table above shows standard target distances. Intermediate range
setting can be obtained by making use of the 0 to 25 graduations on
the adjustment sleeve. These gradations are used as reference points
to accurately compute quarter and half turns, etc. of the adjustment
sleeve. Please notice that there are 25 gradations!
NOTE: the 10x STS does NOT need
adjustment of the objective lens for anything over 50 yards in game
shooting. When adjusted for mean ordinary range the slight
aberration due to change to shorter or longer range is negligible
except for fine target shooting.
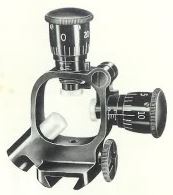
Front and Rear 3-Point Suspension Mounts
The front 3-point suspension mount supports the weight of the scope
on two definite (nylon) bearing points against which the scope is
held by a top spring and plunger. The rib on the top of the tube
mates with the slotted top plunger and this prevents the scope from
turning.
The rear 3-point suspension rear mount provides markings on the
windage and elevation bases which read the same as a micrometer.
When bases are placed 7.2 inches apart, one click of either
adjusting knob with change the center of group 1/4 minute, or 1/4
inch of an inch at 100 yards. The rear mount has Straight Edge
Bearings which insure correct horizontal and vertical adjustments
for each movement of the windage and elevation knobs. The rear mount
has non-rotating nylon rocker bearings which hold the tube without
marring. [ed] not sure what the Straight Edge Bearings look like, on
mine all I see are nylon plungers.
Mounting Base Spacing Effects on Windage
and Elevation
Different spacing of the bases will have an effect on the click
values. The table below shows the click values for 7.2 and 6 Inch
spacing.
WINDAGE AND ELEVATION CLICK VALUES
Distance between centers of scope bases
Range
7.2”
6”
50 feet
.039
.050
25 yards
.062
.075
50 yards
.125
.150
100 yards
.250
.300
200 yards
.500
.400
300 yards
.750
.900
400 yards
1.000
1.200
500 yards
1.250
1.500
600 yards
1.500
1.800
700 yards
1.750
2.100
800 yards
2.000
2.400
900 yards
2.250
2.700
1000 yards
2.500
3.000
TARGET BASES
The front and rear mounts are hardened bases of standard dimensions.
These are referred to as “Standard” or “Unertl” bases. The front
mount is .890” long and the rear mount is 1.250” long.
Attach Scope to Mounting Bases
Care Of Your STS
The STS is designed as to require very little attention. All optical
elements are gasket sealed, outside dirt or moisture cannot enter
the scope. An occasional careful wiping of outer surfaces with a
soft cloth, or paper handkerchief, is all that will be necessary to
keep the optics in good working order. If the outer surfaces become
smeared with oil, or foreign matter, a small amount of liquid (type
used on eye glasses) should be applied to a paper handkerchief and
carefully wiped on the lens surfaces. If the surfaces are extremely
dirty, use a camel’s hair brush to remove any grit which would
scratch the optical surfaces.
It is never necessary to remove any of the optical elements to clean
them. Special tools are required to remove the optical elements and
a telescope should be disassembled only at the factory.
Super-Targetspot models should at all times be used with a fine film
of oil, or equivalent lubrication, on the tube, and at mount bearing
points. This is especially true on large caliber rifles.
POWER CHANGE
Changing the eyepiece of a Super Targetspot
will not in itself affect a complete power change. To retain maximum
field of view. brightness, and eye relief, Internal cells and
diaphragms must be altered. 10, 12, 15 or 20X do not require an
optics change. Conversions to 25 or 30 power also require an optic
change.
Scope
block heights for Lyman Super Targetspot on 1885 w/ No. 3
BarrelPost
Steve Earle responded to me and wrote:
"As a very general rule, using same-height blocks front and rear
covers about 90% of the applications, for "normal" calibers out to
200-300 yds. If you want to shoot 22 shorts at 600, that's another
problem! The basic principle is that the bullet is dropping or
falling as soon as it leaves the muzzle. So having the scope level
means that you'd be using up elevation from the start, just to get
the scope aimed downward at the already-falling bullet. The barrel
taper does this for you, for nothing, and gets you closer to the
center of scope's elevation adjustment from the beginning. Either
3/16" or 1/4" high blocks should be fine here."
 offshore44 wrote in this POST